In the world of software development, safeguarding our code and ensuring its authenticity is crucial. This is where the practice of signing Git commits comes in. It’s like putting a personal seal on your work, confirming that it’s genuinely yours. This not only adds a layer of security but also builds trust in the development process.
However, juggling SSH keys, the tools we use for this signature, can sometimes feel like a balancing act. They’re vital for securing our commits, but keeping them both safe and accessible can be a bit of a challenge. That’s where 1Password can make a big difference. While it’s widely recognized as a secure vault for passwords, it’s also incredibly handy for managing SSH keys. With 1Password, you can securely store your SSH keys and access them easily, using either a master password or biometric authentication.
In this article, I’ll guide you through using 1Password to sign your Git commits with Visual Studio Code, even when using Dev Containers. It’s all about combining security with ease, and I’ll walk you through the steps to integrate these tools smoothly into your workflow.
Understanding Git Commit Signatures: Security and Authenticity
What Does Signing a Commit Mean?
Signing a commit in Git is akin to adding a digital version of your handwritten signature to your code. This process uses cryptographic keys to attach a digital signature to your commits, ensuring an extra layer of security and authenticity.
The Mechanics of Digital Signatures
- Authentication and Integrity: A digital signature authenticates the author of the commit and guarantees the content hasn’t been altered post-signature. It’s a digital way of affirming, “Yes, this work is genuinely mine.”
- Cryptographic Keys: Signing involves two keys: a private key, kept secret, and a public key, which you can share. When you commit, your private key creates a unique signature for that commit. This signature, attached to the commit, can later be verified by others using your public key.
Git’s Trust-Based Model and Its Flaws
- Author vs. Committer: Git commits include ‘Author’ and ‘Committer’. While usually the same, Git allows for flexibility, meaning someone can commit changes on behalf of another.
- Trust Assumption: Initially, Git asks for your
user.emailanduser.name, assuming you provide accurate information. However, anyone can commit using your email, making it appear as if you were the author, especially since Git sets both author and committer based on these configurations. - Flexibility vs. Security: This trust model provides flexibility for migrating or mirroring projects, which might include commits from unreachable contributors. However, it also opens up the possibility of misrepresentation, as there’s no inherent proof of authorship.
Securing Your Commits
- Proving Authenticity: To mitigate potential security flaws in Git’s trust-based model, you have two primary options for signing your commits: using GNU Privacy Guard (GnuPG or GPG) and, for Git version 2.34 and later, SSH keys. You create cryptographic key pairs (public and private) for signing your commits, and then share your public key by uploading it to platforms like GitHub or GitLab.
- Verification: Once you sign a commit with your private key, anyone with access to your public key can verify that the commit indeed came from you. This not only adds a layer of security but also cements your identity as the author of the commit, providing tangible proof of your contribution.

Managing Private Keys: Challenges and the Role of 1Password
The Challenges of Managing Private Keys
Managing private keys for commit signing presents unique challenges, especially in the context of software development:
- Security Risks: Private keys are akin to the master keys of your code’s security. If they fall into the wrong hands, it could compromise the entire integrity of your work.
- Accessibility vs. Safety: You need your private keys to be readily accessible for regular use, yet securely stored to prevent unauthorized access. Balancing accessibility and security is not trivial.
- Complexity in Handling: For those not well-versed in cybersecurity practices, managing these keys can be daunting. Mismanagement can lead to keys being lost or exposed.
How 1Password Simplifies Key Management
1Password offers a streamlined solution to these challenges:
- Secure Storage: Known for its robust security features, 1Password provides a secure vault for storing private keys. The keys are encrypted and can only be accessed through a master password or biometric authentication, significantly reducing the risk of unauthorized access.
- Ease of Access: While ensuring security, 1Password also offers convenient access to your keys. This means you can quickly retrieve your keys for signing commits without compromising on security.
- Simplified Management: 1Password takes the complexity out of managing private keys. It offers an intuitive interface that doesn’t require in-depth knowledge of cybersecurity, making it accessible for all levels of users.
Integration with Development Workflows
Integrating 1Password into your development workflow can enhance both the security and efficiency of your Git operations. It provides a centralized location for all your keys, making it easier to manage them across different machines and development environments.

Setting Up 1Password for SSH and Git Commit Signing
Now, let’s dive into the setup process, starting with 1Password.
Step 1: Installing and Configuring 1Password
- Ensure the 1Password app is installed on your device and that you have an active 1Password subscription. This is your starting point for secure SSH key management.
- Update Git to version 2.34.0 or newer for compatibility and enhanced security.
- Optionally, install the 1Password browser extension (for Safari, Chrome, Firefox, Edge, or Brave) to generate and fill SSH keys in your browser.
With 1Password installed, the next step involves creating your secure SSH key.
Step 2: Generating an SSH Key in 1Password
Let’s set up your SSH key with 1Password. It’s an essential step for secure SSH operations:
- Starting Up: Open your 1Password app. Make sure it’s unlocked and ready to go.
- Navigate to Your Vault: Head over to either your Personal or Private vault. This is where your SSH key will live.
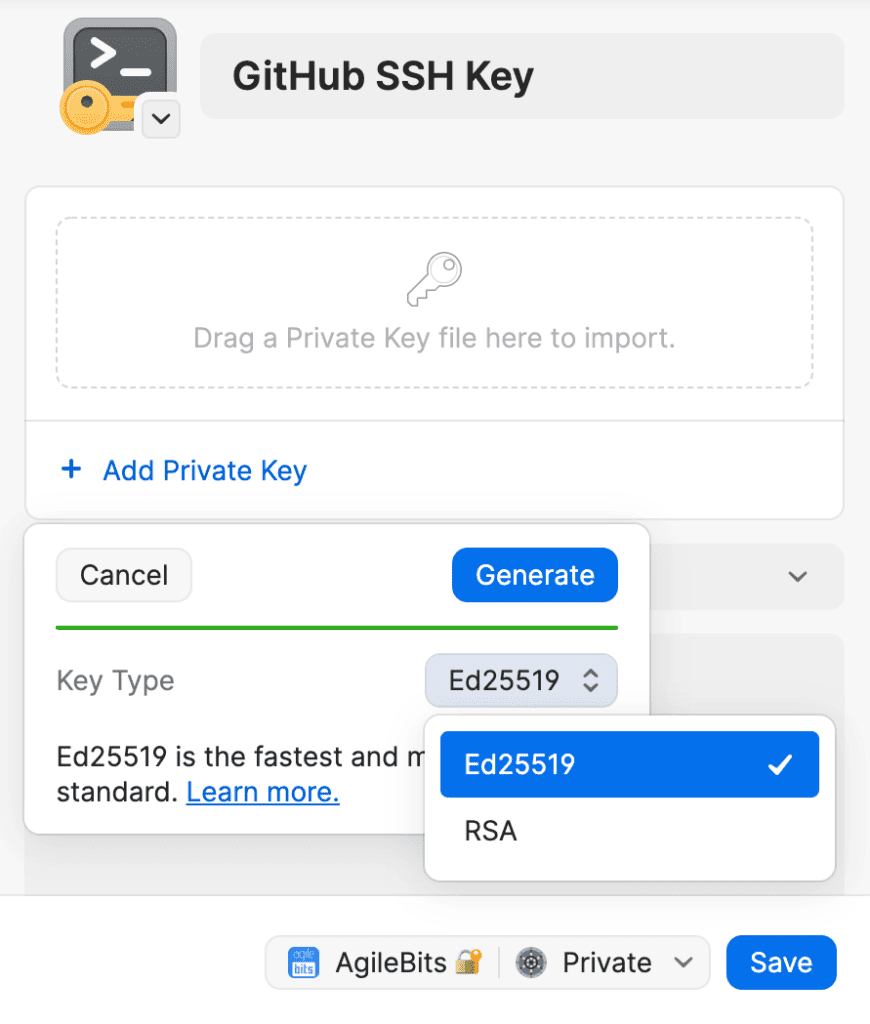
- Create a New SSH Key: Click on ‘New Item’ and then select ‘SSH Key’. You’re now creating a key that will be uniquely yours.
- Key Generation: Choose to ‘Add Private Key’ and then ‘Generate a New Key’. Here you can pick your preferred key type, either Ed25519 or RSA. Customize it to your liking.
- Finalize and Save: Once you’re done setting it up, hit ‘Save’. Your SSH key is now securely generated and stored in 1Password.
Once your SSH key is ready, it’s time to register it for authentication and commit signing.
Step 3: Registering Your Public Key for Commit Signing and Authentication
After generating your SSH keys in 1Password, you need to register your public key on platforms like GitHub or GitLab for verifying commit authenticity and secure access.
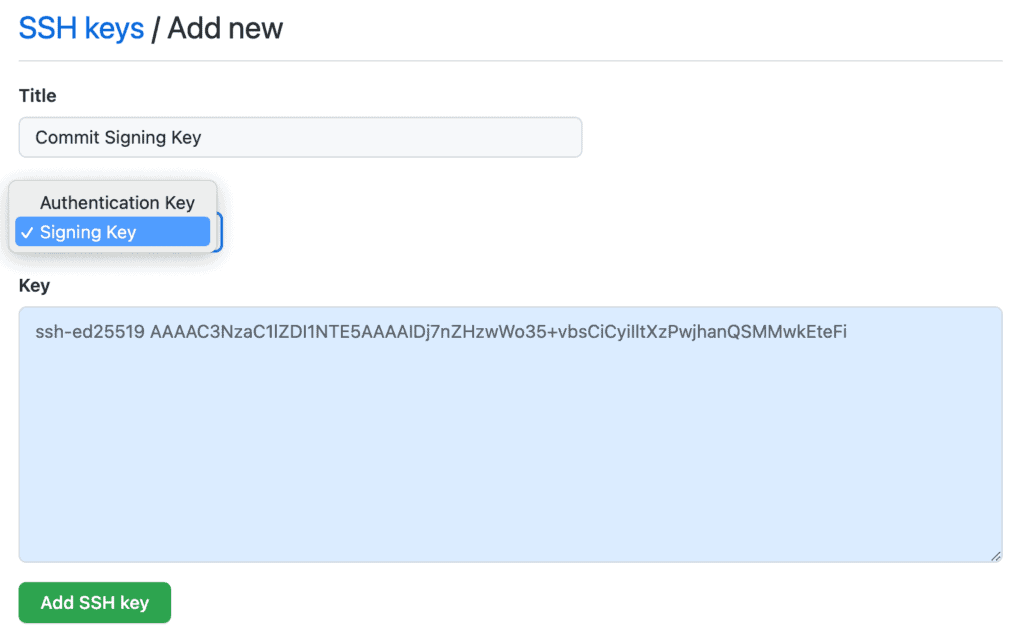
- Go to GitHub SSH key settings.
- Register the same SSH key twice:
- Once as a “Signing key” for commit signing.
- Again as a regular SSH key for authentication.
- Use the 1Password browser extension to easily fill in the public key and key title.
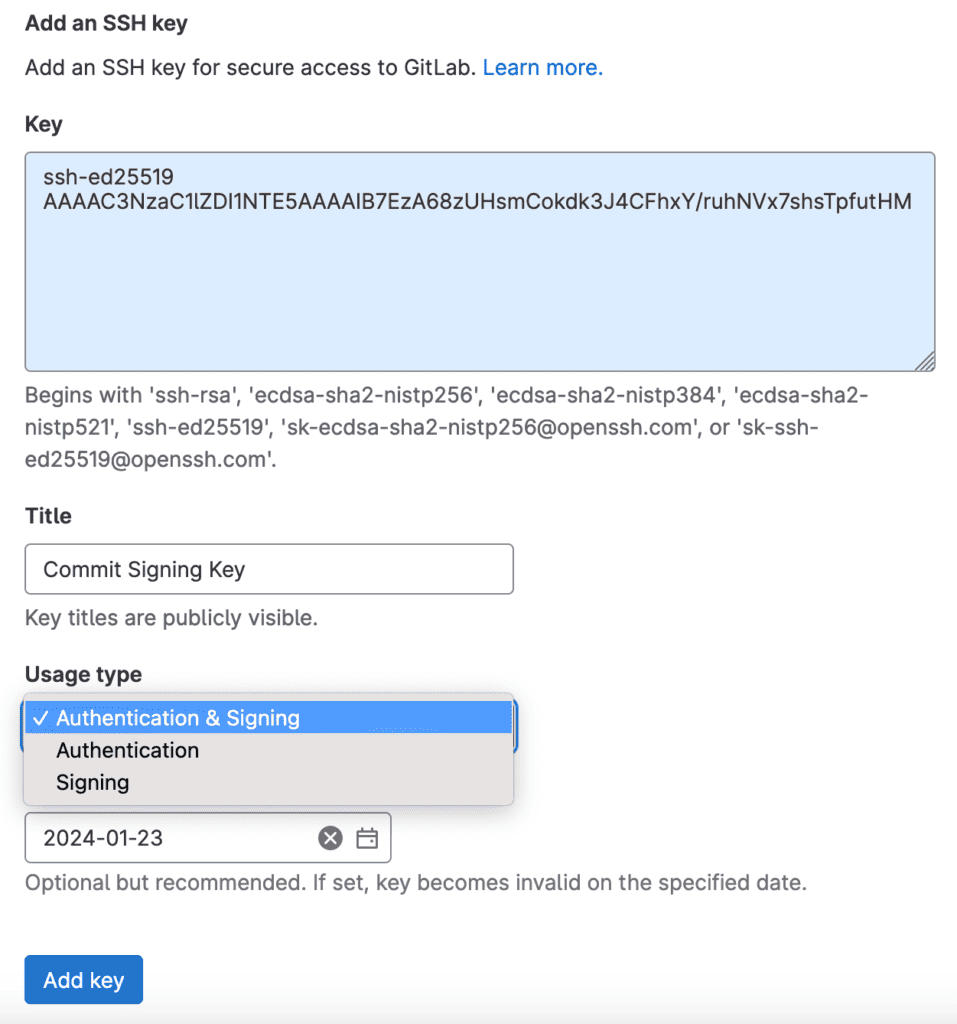
- Visit GitLab SSH key settings.
- Register your SSH key once.
- Set the “Usage type” to “Authentication & Signing” or just “Signing”.
- Again, use the 1Password extension for convenience.
Having registered your key, let’s now activate the 1Password SSH agent to streamline your workflow.
Step 4: Activating the 1Password SSH Agent
Enhance your SSH experience by enabling the SSH agent in 1Password. This tool will smoothly handle your SSH authentications, streamlining your connection process.
- Accessing Settings: Open the 1Password app and go to 1Password > Settings or Preferences, found in the menu bar. Then, head over to the Developer section.
- Enable the SSH Agent: Simply tick the checkbox to ‘Use the SSH agent’. This activates the agent to manage your SSH connections.
- Key Name Display (Optional): For added clarity, you can opt to display key names during authorization. Just check the box for ‘Display key names when authorizing connections’ in the security section.
- Customize Authorization (Optional): Feel free to adjust how and when the SSH agent requests your approval for SSH requests. This adds a personal touch to your security measures.

Activating “Display key names when authorizing connections” makes it easier to know exactly which key is being requested by 1Password during SSH client authentication. This helps in managing multiple keys efficiently.
With the SSH agent activated, the next phase is configuring your SSH client to work seamlessly with 1Password.
Step 5: Configuring Your SSH Client to Use 1Password
Integrating 1Password into your SSH workflow enhances your security setup. Here’s how to do it for different operating systems:
- Add the
IdentityAgentsnippet to your~/.ssh/configfile:
Host *
IdentityAgent "~/Library/Group Containers/2BUA8C4S2C.com.1password/t/agent.sock"- If
~/.sshorconfigdoesn’t exist, create them. - Set the
SSH_AUTH_SOCKenvironment variable in your shell:
export SSH_AUTH_SOCK=~/Library/Group\ Containers/2BUA8C4S2C.com.1password/t/agent.sock- Optionally, create a symlink for easier access
:
mkdir -p ~/.1password && ln -s ~/Library/Group\ Containers/2BUA8C4S2C.com.1password/t/agent.sock ~/.1password/agent.sockEnabling Global Configuration of SSH_AUTH_SOCK for All Clients:
To set the SSH_AUTH_SOCK environment variable globally across all clients without the need to launch them via the terminal, you can use the following method to create a launch agent. This will ensure SSH_AUTH_SOCK is automatically configured for all your applications.
cat << EOF > ~/Library/LaunchAgents/com.1password.SSH_AUTH_SOCK.plist
<?xml version="1.0" encoding="UTF-8"?>
<!DOCTYPE plist PUBLIC "-//Apple//DTD PLIST 1.0//EN" "http://www.apple.com/DTDs/PropertyList-1.0.dtd">
<plist version="1.0">
<dict>
  <key>Label</key>
  <string>com.1password.SSH_AUTH_SOCK</string>
  <key>ProgramArguments</key>
  <array>
    <string>/bin/sh</string>
    <string>-c</string>
    <string>/bin/ln -sf $HOME/Library/Group\ Containers/2BUA8C4S2C.com.1password/t/agent.sock \$SSH_AUTH_SOCK</string>
  </array>
  <key>RunAtLoad</key>
  <true/>
</dict>
</plist>
EOF
launchctl load -w ~/Library/LaunchAgents/com.1password.SSH_AUTH_SOCK.plist- No additional configuration is needed to use the SSH agent with your SSH clients.
- To use the SSH agent with Git, set the
core.sshCommandvariable in your Git config to use Microsoft OpenSSH:
git config --global core.sshCommand "C:/Windows/System32/OpenSSH/ssh.exe"- Or manually edit your gitconfig file:
code[core] sshCommand = C:/Windows/System32/OpenSSH/ssh.exe- Install the latest version of Git for Windows for the best experience.
- Add the
IdentityAgentsnippet to your~/.ssh/configfile:
Host *
IdentityAgent ~/.1password/agent.sock- Create the
~/.sshfolder orconfigfile if they don’t exist. - Set the
SSH_AUTH_SOCKenvironment variable in your shell:
export SSH_AUTH_SOCK=~/.1password/agent.sockEnabling Global Configuration of SSH_AUTH_SOCK for All Clients:
To ensure the SSH_AUTH_SOCK environment variable is consistently set across all clients without needing to start them from the terminal, you can create a login script in /etc/profile.d/. This script will automatically configure SSH_AUTH_SOCK for all sessions.
echo "export SSH_AUTH_SOCK=~/.1password/agent.sock" | sudo tee /etc/profile.d/1password-ssh-auth-sock.shTo prevent the automatic launch of the GNOME keyring SSH agent on your system, you can execute the command below. This will effectively hide the GNOME keyring launch on startup:
mkdir -p ~/.config/autostart \
  && cp /etc/xdg/autostart/gnome-keyring-ssh.desktop ~/.config/autostart/gnome-keyring-ssh.desktop \
  && echo "Hidden=true" >> ~/.config/autostart/gnome-keyring-ssh.desktop
If you skip this step, your system’s GNOME keyring settings might override the settings for 1Password, depending on your OS configuration.
Now that your SSH client is configured, let’s focus on setting up Git commit signing using SSH.
Step 6: Setting Up Git Commit Signing with SSH
Enhance the security of your Git workflow by configuring 1Password to automatically sign your commits with your SSH key.
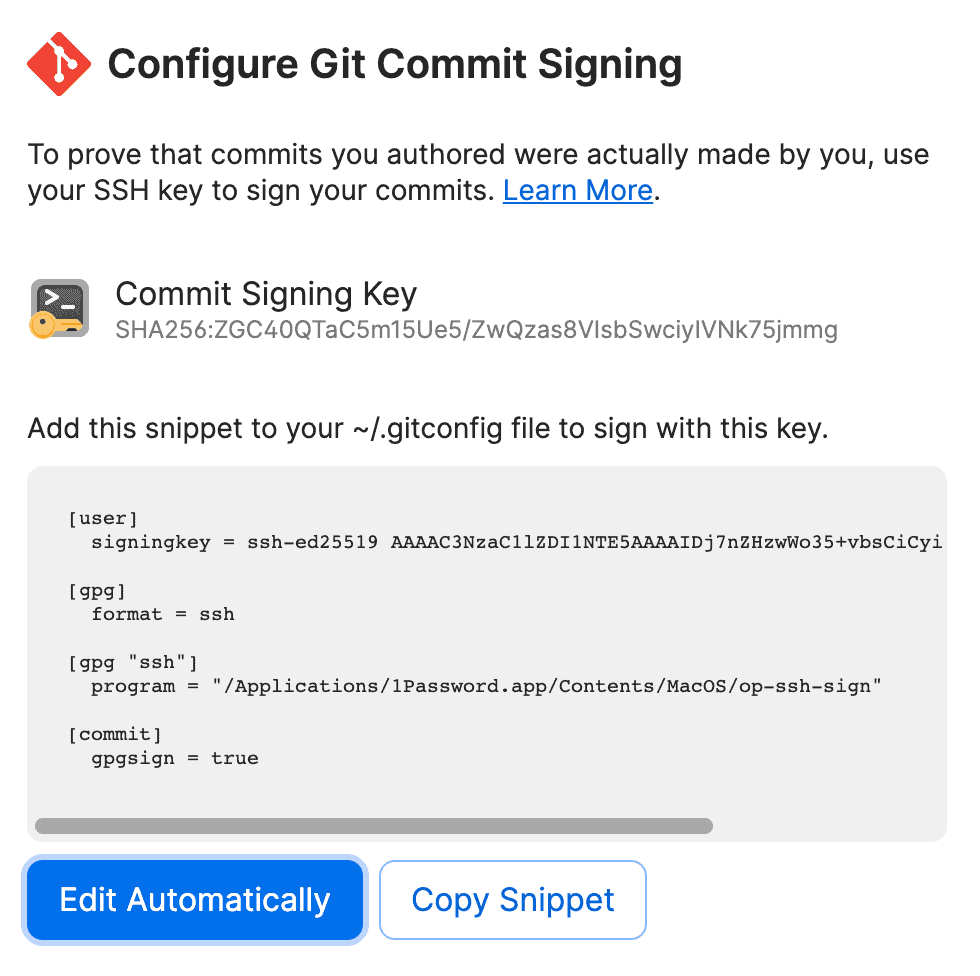
- Open the 1Password desktop app and select the SSH key you intend to use for commit signing.
- Click on the option to ‘Configure Commit Signing’.
- In the following window, choose ‘Edit Automatically’. This will set up your Git to sign commits using the selected SSH key, adding a valuable layer of security and authenticity to your work.
Following these configurations, we’ll address how to enable Git commit signing in VSCode, specifically when using Dev Containers.
Step 7: Getting your first signed Git Commit
After the completion of Step 6, you should be able to perform Git operations using 1Password. For instance, when you execute the command git commit -m "Signing my first commit with SSH", the system will prompt you to authorize your SSH key in the same manner as unlocking the 1Password app (such as using Touch ID or Windows Hello).
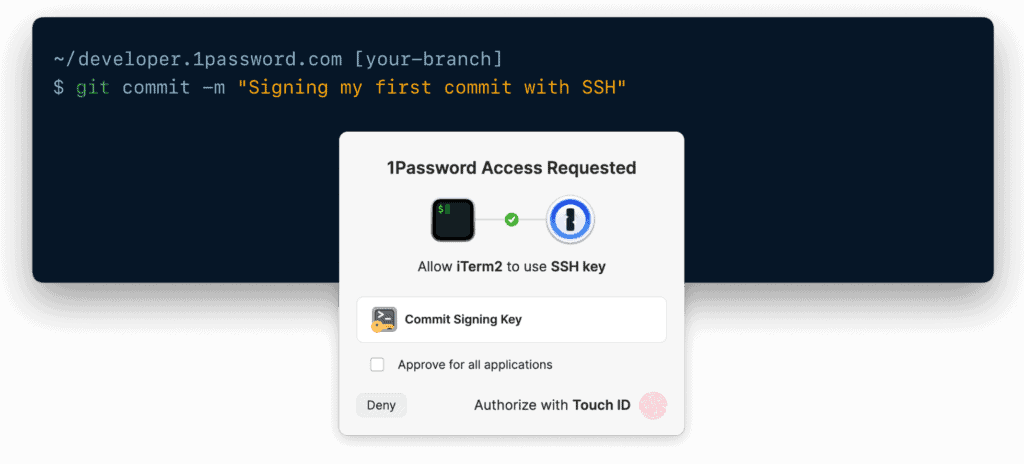
This functionality should be available in any terminal, whether it’s within or outside Visual Studio Code.
Now that you completed your first signed commit, let’s verify its signature.
Step 8: Checking Your Commit Signature
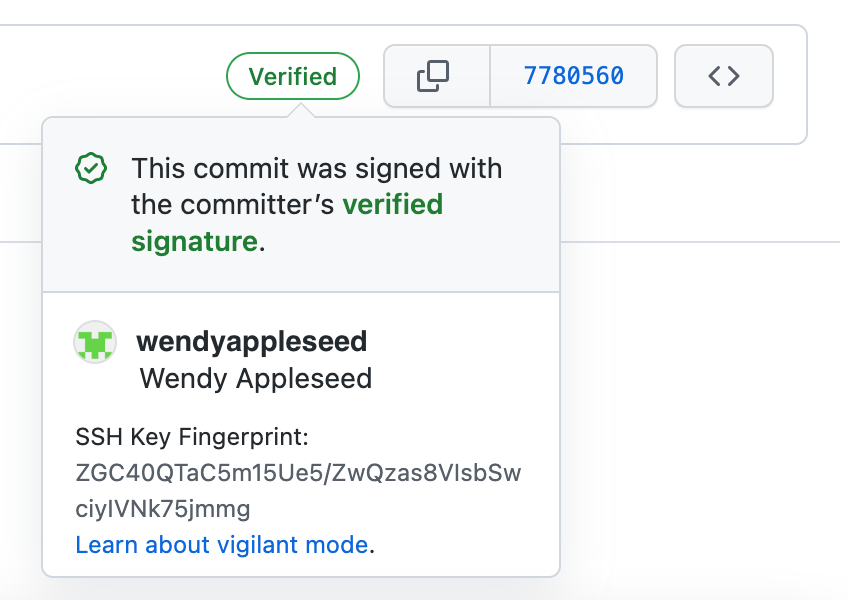
When you view your commit history on GitHub or GitLab, look for a ‘Verified’ badge on commits you’ve signed with SSH. By clicking on this badge, you can view which SSH key was used for the signature.
Enabling Git Commit Signing in VSCode Using Dev Containers
In the previous section, we successfully configured and integrated 1Password and Git to sign commits, allowing us to have a more secure and reliable codebase. However, be aware that this might not work if you are using Dev Containers in your development environment.
To ensure Git commit signing works smoothly in Visual Studio Code using Dev Containers, you need to modify the gitconfig file by removing the [gpg "ssh"] section. This adjustment is necessary as Dev Containers lack access to the binary path on the host machine.
- Locate your
gitconfigfile: Usually in your user directory. - Edit the
gitconfigfile: Open it with a text editor. - Remove the specific section: Delete the lines:
[gpg "ssh"]
program = "[path/to/op-ssh-sign]".- Save the changes: After removal, save and close the file.
This change enables VSCode, within a Dev Container, to sign commits without encountering issues due to the unavailability of the 1Password binary on the host.
After setting everything up, let’s see how you can verify your commit signatures on platforms like GitHub or GitLab.
Try it yourself!
In wrapping up, this guide is your stepping stone into a world where securing your code with 1Password and Visual Studio Code becomes second nature. We’ve walked through the nuts and bolts of signing Git commits, managing SSH keys, and navigating the nuances of Dev Containers. Now, it’s your turn to apply these insights and elevate your development workflow. Dive in, experiment, and see the difference for yourself. And don’t forget, I’d love to hear about your experiences! Feel free to drop comments, share your thoughts, or even recommend this guide to friends. Together, let’s build a more secure and efficient coding community.

